前回は、iBATISの紹介で終わってしまった。今回は、具体的な調査方法を(だらだらと、しかし言葉少なく)紹介したい。結果は、まだ完全にデータが取れたわけではないが、、さして面白いものにもならなさそう(まぁこんなもんかと)。。
iBATISの動作概要と用語については「iBATISはどのくらいメモリを使うのか(1)」に記載している。また、「iBATISはどのくらいメモリを使うのか(3)」に調査結果を掲載した。
さて、調査に用いた環境は、次の通りである。ちなみにRAMは、2GBしかのっていない(ちょいと前のラップトップなもので)。
| 種類 | プロダクト名 | バージョン |
|---|---|---|
| Java | Sun JDK | 1.6.0_18 |
| DB | MySQL | 5.1.45 |
| OS | Windows Vista | 32bit版 Bussiness SP1 |
調査に用いたプロダクト(ライブラリ)については、Mavenのpom.xmlにおけるdependencies要素を示せばよいだろう。iBATISは2.xを、Spring Frameworkは3.0を用いた。
  <dependencies>
    <dependency>
      <groupId>org.springframework</groupId>
      <artifactId>spring-orm</artifactId>
      <version>3.0.0.RELEASE</version>
      <scope>runtime</scope>
    </dependency>
    <dependency>
      <groupId>log4j</groupId>
      <artifactId>log4j</artifactId>
      <version>1.2.14</version>
      <scope>runtime</scope>
    </dependency>
    <dependency>
      <groupId>commons-dbcp</groupId>
      <artifactId>commons-dbcp</artifactId>
      <version>1.2.2</version>
      <scope>runtime</scope>
    </dependency>
    <dependency>
      <groupId>org.apache.ibatis</groupId>
      <artifactId>ibatis-sqlmap</artifactId>
      <version>2.3.4.726</version>
      <optional>true</optional>
    </dependency>
    <dependency>
      <groupId>mysql</groupId>
      <artifactId>mysql-connector-java</artifactId>
      <version>5.1.12</version>
      <scope>runtime</scope>
    </dependency>
  </dependencies>
以下に、調査用のアプリケーションを作成した方法と、メモリの情報を取得した方法について、簡単に説明する。
1.アプリケーションを作成する
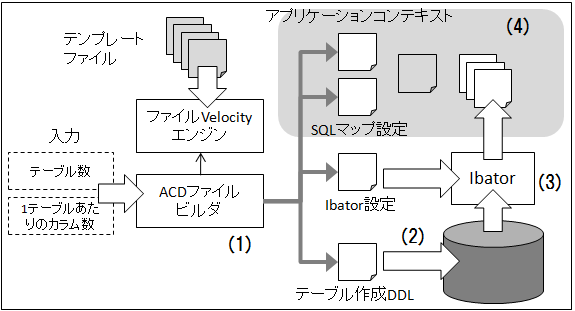
アプリケーションは、次の図のようにして作成した。今回はとりあえず、テーブル数が多くなった時に、DAO層がどの程度メモリを消費するのかを知りたかった。そこでまず(1)で、テーブル数をインプットとして、テンプレートエンジンを用い、各種設定ファイルとテーブルを作成するDDLを出力した。次に(2)で、出力したDDLを用いてテーブルを作成した。(3)では、Ibatorと呼ばれる、テーブル情報からiBATISで用いるDAO層(DAO、DTOおよびSQLマップファイル)を作成するためのツール*1を用いた。特に拡張せず、デフォルトの設定のままDAO層を生成した。最後に(4)で、(1)で生成した設定ファイルと(3)で生成したDAO層をビルドして、アプリケーションを作成した。
以下に、図中の(1)から(4)で用いたファイルやソースコードを紹介する。
(1) 設定ファイルとDDLを作成する
設定ファイルは、JavaによるテンプレートエンジンであるVelocityを用いて作成することにした*2。クラスパス上にあるテンプレートファイルから設定ファイルを作成する、ファイルVelocityエンジン(FileVelocityEngineクラス)を作ってみた。このクラスは、次のように、非常にシンプルなVelocityEngineクラスの便利クラスである*3。
public class FileVelocityEngine {

    private VelocityEngine velocity = new VelocityEngine();

    public void init() {
        Properties props = new Properties();
        props.setProperty(
                "resource.loader",
                "FILE");
        props.setProperty(
                "FILE.resource.loader.class",
                "org.apache.velocity.runtime.resource.loader.ClasspathResourceLoader");
        try {
            velocity.init(props);
        } catch (Exception e) {
            throw new RuntimeException(e);
        }
    }

    public void create(VelocityContext context, String templateClassPath, File outputFile) {
        Writer writer = null;
        try {
            Template template = velocity.getTemplate(templateClassPath);
            writer = new FileWriter(outputFile);
            template.merge(context, writer);
        } catch (Exception e) {
            throw new RuntimeException(e);
        } finally {
            try {
                if (writer != null) writer.close();
            } catch (IOException e) {
                throw new RuntimeException(e);
            }
        }
    }

}
ここからは、このファイルVelocityエンジンに読み込ませるテンプレートファイル(.vm)を列挙していく。テーブルを作成するDDLのテンプレートファイル「createTableDdl.vm」は、次の通りである。ひたすらcreate table文を生成するだけ。面倒だったので、カラムの型VARCHAR(45)は固定にした。ちなみに今回は、MySQL上にmeasureというスキーマを作成した。
#foreach( $tableName in $tableInfoMap.keySet() )
  CREATE TABLE `measure`.`$tableName` (
  #foreach( $columName in $tableInfoMap.get($tableName) )
      `$columName` VARCHAR(45),
  #end
    PRIMARY KEY (`VCH_45_0000`)
  )
  ENGINE = InnoDB;

#end
Ibatorで用いる設定ファイル(ibatorConfig.xml)のテンプレートファイル「ibatorConfig.vm」は、次の通りである。これは、最もシンプルな設定内容(Ibatorのドキュメントにある例とほとんど同じ)である。テンプレートエンジンを用いて、table要素に対象のテーブル名を追加しているだけ。
検証のためとは言え、ユーザをrootにしたのは失敗だったなぁ。やっちゃダメ。
<?xml version="1.0" encoding="UTF-8"?>
<!DOCTYPE ibatorConfiguration
  PUBLIC "-//Apache Software Foundation//DTD Apache iBATIS Ibator Configuration 1.0//EN"
  "http://ibatis.apache.org/dtd/ibator-config_1_0.dtd">

<ibatorConfiguration>
  <classPathEntry location="mysql-connector-java-5.1.12-bin.jar" />

  <ibatorContext id="ibatis_test" targetRuntime="Ibatis2Java2">
    <jdbcConnection driverClass="com.mysql.jdbc.Driver"
        connectionURL="jdbc:mysql://localhost:3306/measure"
        userId="root"
        password="root">
    </jdbcConnection>

    <javaTypeResolver >
      <property name="forceBigDecimals" value="false" />
    </javaTypeResolver>

    <javaModelGenerator targetPackage="test.ibatis.model" targetProject="ibatis_test\src\main\java">
      <property name="enableSubPackages" value="true" />
      <property name="trimStrings" value="true" />
    </javaModelGenerator>

    <sqlMapGenerator targetPackage="test.ibatis.model"  targetProject="ibatis_test\src\main\java">
      <property name="enableSubPackages" value="true" />
    </sqlMapGenerator>

    <daoGenerator type="SPRING" targetPackage="test.ibatis.dao"  targetProject="ibatis_test\src\main\java">
      <property name="enableSubPackages" value="true" />
    </daoGenerator>

#foreach( $tableName in $tableInfoMap.keySet() )
    <table schema="measure" tableName="$tableName" >
    </table>
#end

  </ibatorContext>
</ibatorConfiguration>
Spring FrameworkのDI(Dependency Injection)定義は、applicationContext.xmlに設定する。このファイルのテンプレートである「applicationContext.vm」は、次の通りである。テンプレートエンジンを用いて、DAOのbean要素を追加しているだけ。全てのDAOに、(シングルトンである)SQLマップクライアントをインジェクションしているのがわかるだろう。
<?xml version="1.0" encoding="UTF-8"?>
<beans xmlns="http://www.springframework.org/schema/beans"
       xmlns:xsi="http://www.w3.org/2001/XMLSchema-instance"
       xsi:schemaLocation="http://www.springframework.org/schema/beans
           http://www.springframework.org/schema/beans/spring-beans-3.0.xsd"
       default-lazy-init="false">

  <bean id="dataSource" class="org.apache.commons.dbcp.BasicDataSource" destroy-method="close">
    <property name="driverClassName" value="com.mysql.jdbc.Driver"/>
    <property name="url" value="jdbc:mysql://localhost:3306/measure"/>
    <property name="username" value="root"/>
    <property name="password" value="root"/>
  </bean>

  <bean id="sqlMapClient" class="org.springframework.orm.ibatis.SqlMapClientFactoryBean">
    <property name="configLocation" value="sqlmap-config.xml"/>
    <property name="dataSource" ref="dataSource"/>
  </bean>

#foreach( $daoBeanId in $daoBeanIdClassMap.keySet() )
  <bean id="$daoBeanId" class="$daoBeanIdClassMap.get($daoBeanId)">
    <property name="sqlMapClient" ref="sqlMapClient"/>
  </bean>
#end

</beans>
SQLマップ設定ファイル(sqlmap-config.xml)のテンプレートである「sqlmap-config.vm」は、次の通りである。テンプレートエンジンを用いて、SQLマップファイルを追加しているだけである。
<?xml version="1.0" encoding="UTF-8"?>
<!DOCTYPE sqlMapConfig PUBLIC "-//ibatis.apache.org//DTD SQL Map Config 2.0//EN" "http://ibatis.apache.org/dtd/sql-map-config-2.dtd">
<sqlMapConfig>
  <settings
    useStatementNamespaces="true"
    statementCachingEnabled="true"
    classInfoCacheEnabled="true" />

#foreach( $sqlMapResourceName in $sqlMapResourceSet )
  <sqlMap resource="$sqlMapResourceName" />
#end

</sqlMapConfig>
これらの設定ファイルおよびDDLをまとめて、ACD(Application Config and DDL)と(勝手に)名付けた。そして、これらのファイルを作成する、AcdFileBuilderというクラスを作った。
/** テーブル数 */
private final int tableNumber;

/** 1テーブルあたりのカラム数 */
private final int columnNumber;

public AcdFileBuilder(int tableNumber, int columnNumber) {
    super();
    this.tableNumber = tableNumber;
    this.columnNumber = columnNumber;
}

public void createConfigFile(File outputDir) throws Exception {
    FileVelocityEngine engine = new FileVelocityEngine();
    engine.init();

    // コンテキストにマージする値を設定する。

    VelocityContext context = new VelocityContext();
    Map<String, List<String>> tableInfoMap = getTableInfoMap();
    context.put("tableInfoMap", tableInfoMap);

    Set<String> sqlMapResourceSet = getSqlMapResourceSet(tableInfoMap.keySet());
    context.put("sqlMapResourceSet", sqlMapResourceSet);

    Map<String, String> daoBeanIdClassMap = getDaoBeanIdClassMap(tableInfoMap.keySet());
    context.put("daoBeanIdClassMap", daoBeanIdClassMap);

    // テンプレートに値をマージし、ファイルを作成する。

    engine.create(context, "createTableDdl.vm",     new File(outputDir, "createTable.sql"));
    engine.create(context, "ibatorConfig.vm",       new File(outputDir, "ibatorConfig.xml"));
    engine.create(context, "sqlmap-config.vm",      new File(outputDir, "sqlmap-config.xml"));
    engine.create(context, "applicationContext.vm", new File(outputDir, "applicationContext.xml"));
}

/**
 * @return テーブル情報マップ(キーがテーブル名で、値がカラム名のリスト)
 */
private Map<String, List<String>> getTableInfoMap() {
    Map<String, List<String>> tableInfoMap = new TreeMap<String, List<String>>();

    for (int i = 0; i < tableNumber; i++) {
        List<String> columnNames = new ArrayList<String>();
        for (int j = 0; j < columnNumber; j++) {
            columnNames.add("VCH_45_" + leftZeroPadding(j, 4));
        }
        tableInfoMap.put("TBL_VCH_" + leftZeroPadding(i, 4), columnNames);
    }
    return tableInfoMap;
}

/**
 * @param tableNameSet テーブル名のセット
 * @return SQLマップのクラスパス文字列のセット
 */
private Set<String> getSqlMapResourceSet(final Set<String> tableNameSet) {
    Set<String> set = new TreeSet<String>();
    for (String tableName : tableNameSet) {
        set.add("test/ibatis/model/" + tableName.toLowerCase() + "_SqlMap.xml");
    }
    return set;
}

/**
 * @param tableNameSet テーブル名のセット
 * @return キーがDAOインスタンスのBean ID、値がDAOインスタンスの実装クラス名であるマップ
 */
private Map<String, String> getDaoBeanIdClassMap(final Set<String> tableNameSet) {
    Map<String, String> map = new TreeMap<String, String>();
    for (String tableName : tableNameSet) {
        map.put(getDaoBeanId(tableName), getDaoImplClassName(tableName));
    }
    return map;
}

private static String getDaoBeanId(String tableName) {
    return underScoreSeparatedToCamelCase(tableName, false) + "DAO";
}

private static String getDaoImplClassName(String tableName) {
    return "test.ibatis.dao." + underScoreSeparatedToCamelCase(tableName, true) + "DAOImpl";
}

private static String leftZeroPadding(int target, int resultLength) {
    int targetLength = Integer.toString(target).length();
    StringBuilder sb = new StringBuilder();
    while (sb.length() + targetLength < resultLength) sb.append('0');
    sb.append(target);
    return sb.toString();
}

/**
 * 例えば、{@code DREAMs_come_true} が指定された場合には、{@code DreamsComeTrue} を返す。
 * @param underScoreSeparatedString アンダースコアで区切られた文字列
 * @param firstCharUpperCase 先頭の文字を大文字にする場合に{@code true}
 * @return アンダースコアを除き、キャメルケースに変換した文字列
 * @throws IllegalArgumentException 引数にアンダースコアが連続した文字列を指定した場合に
 * スローされる
 */
private static String underScoreSeparatedToCamelCase(
        String underScoreSeparatedString, boolean firstCharUpperCase) {
    StringBuilder sb = new StringBuilder();
    boolean underScored = firstCharUpperCase;
    for (char ch : underScoreSeparatedString.toCharArray()) {
        if (underScored) {
            if (ch == '_') {
                underScored = true;
                throw new IllegalArgumentException(
                        String.format("アンダースコア(_)が連続しています。"
                                + "[underScoreSeparatedString=%s]",
                                underScoreSeparatedString));
            } else {
                underScored = false;
                sb.append(Character.toUpperCase(ch));
            }
        } else {
            if (ch == '_') {
                underScored = true;
            } else {
                underScored = false;
                sb.append(Character.toLowerCase(ch));
            }
        }
    }
    return sb.toString();
}
例えば、20カラムのテーブルが2000必要な場合には、このクラスを用いて、次を実行すればよい。
  AcdFileBuilder builder = new AcdFileBuilder(2000, 20);
  builder.createConfigFile(new File("C:\\ibatis_test\\acd_out"));
(2) テーブルを作成する
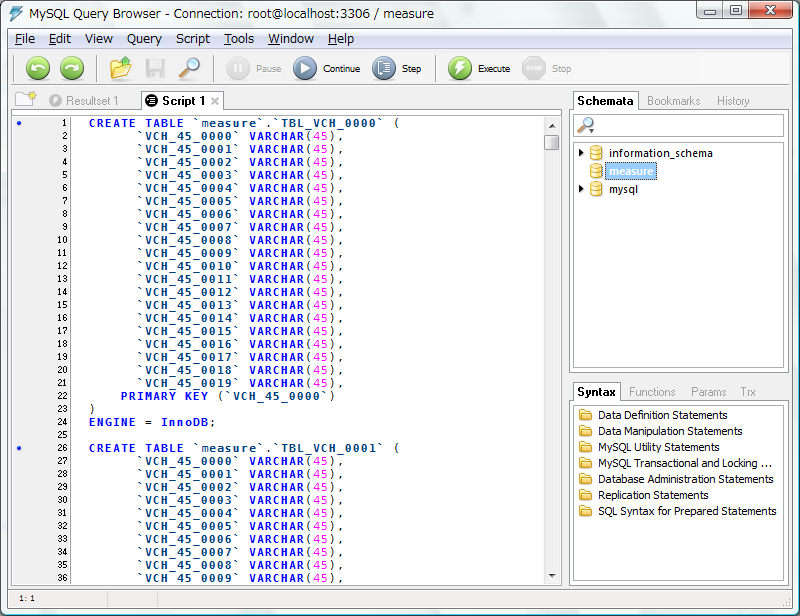
MySQL GUI Toolsに含まれている、MySQL Query Browserを用いて、(1)で作成したDDLを実行した。別にコマンドで実行してもよかったのだが、なんとなく(ヘタレなので)。
1000や2000テーブルを作成すると、カップ麺ができあがる(そして、のびる)くらいは時間がかかるので、今回のマックスである2500テーブルを作成しておいた。
2.メモリの情報を取得する
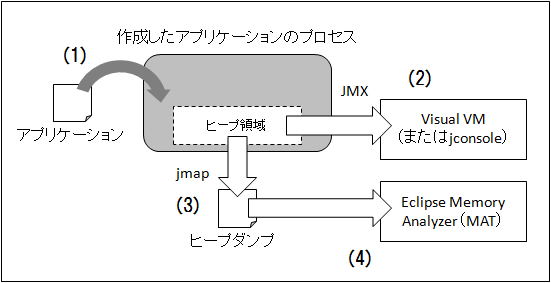
メモリの情報は、次の図のようにして取得した。
以下に、図中の(1)から(4)の詳細を説明する。
(1) アプリケーションを起動する
アプリケーションを起動する際に、次のオプションを指定した。
| オプション | 説明 |
|---|---|
| -Dcom.sun.management.jmxremote | JMXのリモート接続を有効にする |
| -Xms512m | 初期ヒープサイズを512MBにする |
| -Xmx1024m | 最大ヒープサイズを1024MBにする |
| -XX:MaxPermSize=512m | 最大パーマネントサイズを512MBにする |
今回は(面倒だったので)、Eclipseでアプリケーションを作成し、Eclipseから起動した。jarを作成し、コマンドプロンプトからjavaコマンドで起動したい場合には、dependency-maven-pluginを用いてjarファイルをかき集め、クラスパスに通して実行すればよい。
(2) ヒープの状態を監視する
次のようにVisualVMを起動し、JMXにて(1)のプロセスに接続した(jconsoleでもよかったが、見た目でなんとなく)。
%JAVA_HOME%\bin\jvisualvm.exe
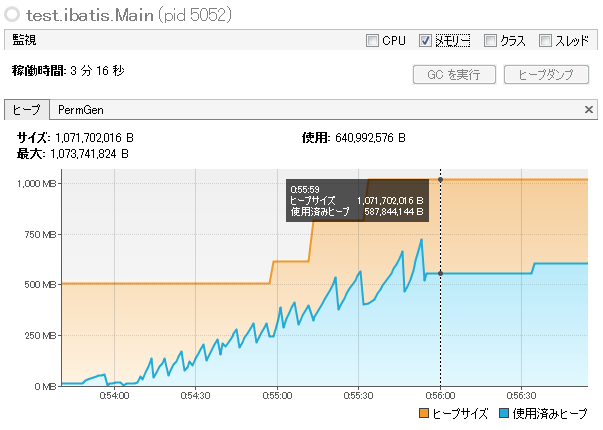
ちなみに、2000テーブルの場合には、次のようにヒープ領域が使われていた。
(3) ヒープダンプを取得する
JDKに含まれているjmapを用いて、アプリケーションコンテキスト(ApplicationContextのインスタンス)を生成後(スリープ中)の、ヒープダンプを取得した(VisualVMで取得してもよかったが、慣れている方法でなんとなく)。なお、次の
jmap -dump:format=b,file=<filename> <pid>
(4) ヒープダンプを解析する
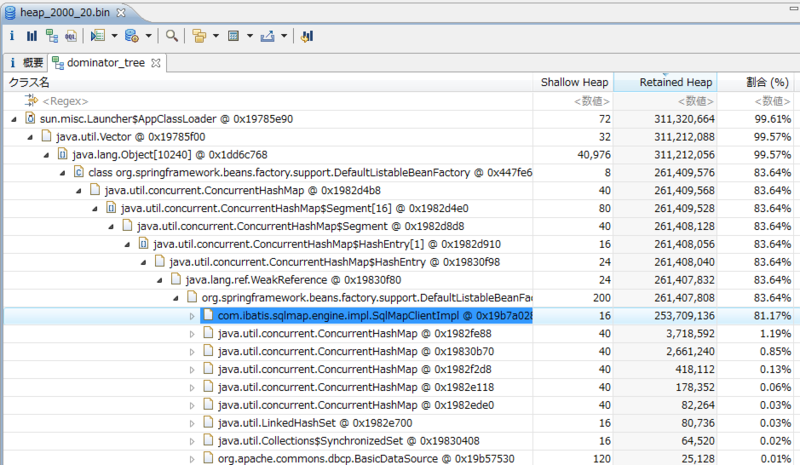
Eclipse Memory Analyzer(MAT)を用いて、ヒープダンプを解析した。これにより、ヒープ領域中のインスタンスが、どの程度メモリを用いているのかがわかる。次には、2000テーブル分のDAO層を持つアプリケーションコンテキストを初期化した際の、ヒープ領域中のインスタンスが示されている。この画像からは、SQLマップクライアントが、253MB*4を使っていることがわかる。
なお、この画像にある「Shallow Heap」と「Retained Heap」は、次の意味である(MATのヘルプを参考にした)。
- Shallow Heap: 1つのオブジェクトのみによって消費されるメモリ。1つの参照につき32bit(今回は32bitのプロセッサだから)が消費される。例えば、Integerでは4バイト、Longでは8バイト
- Retained Heap: GCにより除去される一連のオブジェクトが使うShallow Heapの合計。オブジェクトのツリーが直接使っているメモリ
(2)における使用済みヒープと、このRetained Heapとでは、けっこうな差がある。これは、GC未済みのインスタンスが用いている領域や、コンパクション未済みの領域ではないだろうか。
2010/07/06追記
今さらではあるが、「iBATISはどのくらいメモリを使うのか(3)」に、調査結果を掲載した。
